Verified Purchase
The postage-style border gives tiny paper decorations a finished look. It saves me from having to cut every little edge with scissors.
Couldn't load pickup availability
For best results, use 80–200 GSM paper and punch one sheet at a time. Avoid thick cardboard or materials outside the recommended paper range.
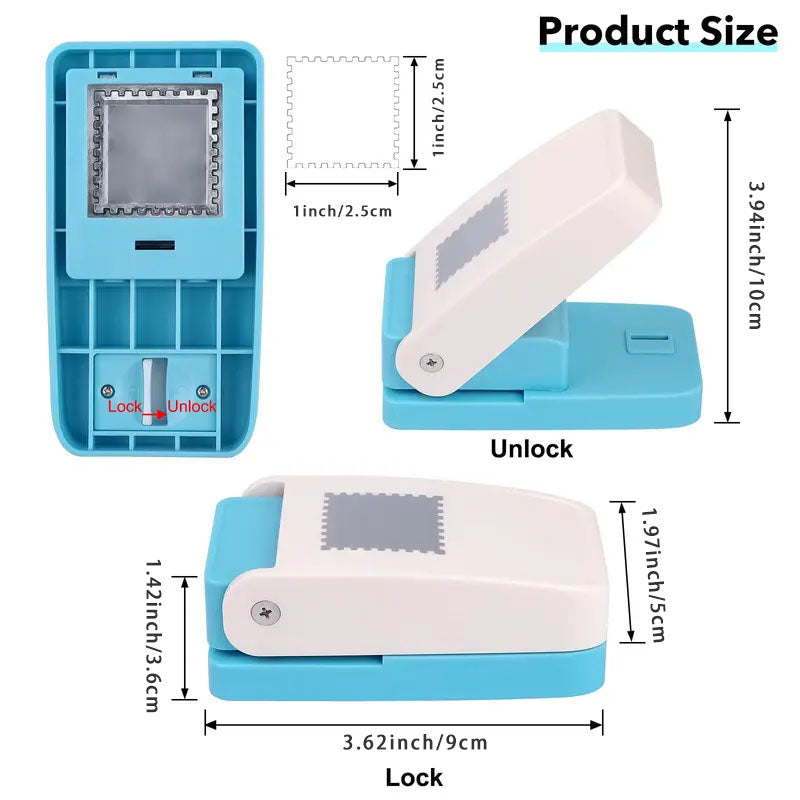
Note: Cutting dimensions refer to the finished paper shapes, not the punch tool itself.
Orders are typically processed, inspected, prepared, and packed within 1–2 business days before being handed over to the shipping carrier.
Orders placed on weekends generally begin processing on the next business day.
Once shipped, delivery typically takes 5–7 business days.
Actual delivery times may vary depending on the destination country, customs clearance, local carriers, public holidays, weather conditions, and other logistics factors.
To request a return, please contact support@cozytraildel.com before sending any products back.
Include your order number, the email address used at checkout, the reason for your return, and any required photo or video evidence.
Our customer service team will review your request. If eligible, we will provide return authorization and instructions.
Transform your favorite paper scraps into charming postage stamp-shaped cutouts with just one press.
Add a unique vintage touch to your junk journals, scrapbooks, handmade cards, and creative DIY projects.
Thoughtfully designed for smooth cutting, easy handling, and beautiful paper creations.
Create beautifully defined postage stamp-shaped cutouts with decorative edges—no tedious hand trimming needed.
Features a zinc alloy cutting head designed for smooth, clean paper cutting.
The lever-style handle and alignment guide make positioning and punching paper simple, with minimal effort.
A lightweight ABS plastic body makes it easy to handle, while the built-in handle lock keeps it secure when stored.

Create beautiful postage stamp-shaped cutouts in just 3 easy steps.
Release the safety lock by sliding the switch to the right, then insert and align one sheet of paper in the guide slot.
Apply steady downward pressure on the lever handle to cut out your stamp shape.
Take out your vintage-style stamp cutout and add it to journals, handmade cards, scrapbooks, or DIY paper projects.
For best results, use 80–200 GSM paper and punch one sheet at a time.

One little punch, endless ways to get creative! Turn your favorite patterned papers and printed designs into charming vintage-style accents for all your paper crafting projects.
Bring vintage charm to memory books, journal spreads, and collage pages with unique stamp-shaped paper accents.
Add a thoughtful personal touch to greeting cards, holiday gifts, and handmade tags with your favorite patterned papers.
Mix colors, prints, and textures to create decorative accents for bookmarks, collages, and one-of-a-kind paper crafts.
Compact and easy to pack in your craft kit, so you can enjoy creative journaling, craft sessions, and DIY projects wherever inspiration strikes.

Everything you need to know about your postage stamp paper punch.
For best results, we recommend 80–200 GSM paper. The punch works with many types of paper, including colored paper, printed paper, lightweight cardstock, and compatible sticker paper.
We recommend punching one sheet at a time. Stacking multiple sheets may affect cutting quality and shorten the lifespan of the cutting head.
Lightweight cardstock and decorative paper within the recommended 80–200 GSM range generally work best.
Specialty materials such as metallic paper, vellum, or thin craft foam may behave differently. We recommend testing a small piece first. Avoid thick cardboard and never force the punch.
Two cutting shapes are available:
These measurements refer to the finished paper cutouts, not the dimensions of the punch tool.
No. Each paper punch is sold individually. Your order includes one punch in your selected shape and size.
It's simple!
Lock the handle again when storing the punch.
No. This is a manual paper cutting tool, not a printer. It cuts your paper into decorative postage stamp shapes.
Use patterned or pre-printed paper to create your own unique vintage-style decorations.
To maintain clean cutting performance, use paper within the recommended thickness range and punch one sheet at a time.
You can also occasionally punch through a piece of aluminum foil as a maintenance tip. This may help with cutting performance, but it will not restore a worn or damaged blade.
If the punch stops cutting cleanly, avoid forcing the handle.
The internal metal mechanism may feel slightly stiff when new. First, make sure the punch is fully unlocked and free of any paper jams.
If needed, apply a tiny amount of suitable light machine oil to the exposed metal mechanism on the back of the punch.
Keep oil away from the cutting opening and paper, and wipe off any excess before use. Never force a stuck handle.
The postage-style border gives tiny paper decorations a finished look. It saves me from having to cut every little edge with scissors.

I prefer the square cutout for small floral prints. A centered flower looks like a miniature vintage stamp when I add it to my journal.

The rectangle shape suits the narrow labels I make for scrapbook pages. It has that old-fashioned postage feel I was looking for.

Instead of throwing away patterned-paper scraps, I turn the nicer pieces into little stamp shapes. It makes good use of leftovers from card projects.

The press-down handle is straightforward to use. Once the paper is positioned, I can cut the shape without tracing a template first.

I appreciate the built-in lock when I put my supplies away. The handle stays secured rather than sticking up in my craft drawer.
The lightweight body is convenient when I move between my craft desk and the dining table. It's easy to pick up and put away.
I cut small sections of an old-style map print for my travel scrapbook. The postage edges fit the travel theme beautifully.
For handmade birthday cards, a stamp-shaped piece of patterned paper makes a lovely accent next to the message.
Working with just one sheet at a time gives me more control over placement. I can see exactly which little design I want to cut.
A botanical illustration looks especially sweet in the square version. I layer the cutout over kraft paper for a simple vintage effect.
I use it to make decorations that match the colors already in my junk journal. That's more flexible than buying a pack of premade embellishments.
I tried medium-weight craft paper in the recommended range. The clean decorative outline is what makes the cutout stand out.
It doesn't take up much space beside my scissors, glue, and paper trimmer. Handy for the small details at the end of a collage.
I picked the rectangle version because it fits my mini printed phrases nicely. It is useful for making little journal labels.
The small cutout size is ideal for accents, not full-size tags. It helps to know that before planning a project.
I like using plain cream paper, then adding ink around the stamp-shaped edge. The result works well with aged-paper themes.
A few cutouts in coordinating colors make a scrapbook photo arrangement feel more cohesive without covering much of the picture.
The lever-style motion is simpler for me than holding a tiny die and cutting it by hand. I can focus on arranging the finished shapes.
I used a printed butterfly illustration in a journal spread. The punch framed the little image in a fun, postage-inspired way.
This tool cuts the outline; it doesn't print the artwork. I like choosing my own designs because every paper stamp can look different.
For a pen-pal letter, I made several decorative paper stamps to tuck inside the envelope. A small personal detail that was fun to prepare.
I create little clusters with cutouts, torn paper, and washi tape. The neat stamp border contrasts nicely with the rough torn edges.
The square shape works well for repeating patterns. I cut several pieces from the same paper and arranged them in a grid on my scrapbook page.
I use the rectangle cutout for date labels in my memory journal. The proportion leaves room for a short handwritten note.
Having a locking switch is useful when packing craft supplies for a workshop. I make sure the handle is secured before putting it in my bag.
The edge detail is the best part for my projects. Even simple solid-color cardstock looks more interesting when cut into a postage shape.
I made little accents for holiday greeting cards using printed winter paper. The stamp border added a nostalgic touch without extra trimming.
For a layered collage, I place a small punched piece over a slightly larger paper rectangle. The two borders make a nice contrast.
I appreciate being able to position a tiny illustration in the cutting area before pressing. It makes small, intentional cutouts possible.
A neutral paper with handwritten numbers becomes a pretty faux postage embellishment. Great for understated journal spreads.
This is for paper crafts rather than thick cardboard. Staying with the recommended paper weight makes the project much easier.
I made accents for a handmade thank-you card using pieces of leftover floral stationery. The finished shapes look coordinated.
The decorative cutouts are small enough to tuck into pockets and tags in my journal. They add detail without creating a bulky page.
I like pairing the stamp-shaped paper with a rubber-stamped word. It gives me a custom embellishment instead of a ready-made sticker.
I used it for a memory-book page about a weekend trip. Tiny cutouts from printed photos on suitable paper fit the travel theme.
The metal cutting head and lever-style handle are a practical combination for making small paper shapes. I keep it near my everyday craft tools.
A sheet of polka-dot paper becomes a set of playful little decorations. The punched edges make the pattern feel more intentional.
My favorite use is building a tiny collage inside the border after punching a plain piece of paper. Each one can have a different theme.
It is nice to have a dedicated tool for this border. Reproducing the same postage-edge shape with scissors would take much longer.
I cut decorative pieces from printed sheet-music paper for a music-themed scrapbook. The little stamps blended right into the layout.
The cutout shape gives me a starting point for small gift-wrap decorations. I attach the paper piece to a tag with glue or tape.
I used several squares as a row across the bottom of a journal page. The repeated outline made the layout feel organized.
The ABS housing is light enough for me to move around my workspace as I switch between different paper designs.
I like that I can experiment with color: one paper stamp in soft pastels, another in dark vintage tones, all cut with the same shape.
For a mini album, I made cutouts featuring little numbers and letters. They worked nicely as section markers on the page.
The postage border looks charming around black-and-white printable artwork. It's a simple way to make monochrome collages more decorative.
I am careful not to stack sheets in the punch. Cutting them separately takes a bit more time, but makes it easier to line up each design.
The finished pieces fit into narrow spaces in my journal margins. That size is useful when a page is already full of notes and photos.
I made a little set of handmade decorations for a friend's scrapbook kit. Using different patterned papers gave the set a coordinated look.
The rectangular cutout works well alongside faux postmark designs. It's an easy way to build a travel-letter aesthetic on paper.
I tried a few types of decorative paper and found it worth testing a scrap first. Paper texture can change how a small punch feels.
The lock is a sensible detail for storage. I slide it into place before putting the punch back on the shelf.
I like making postage-shaped pieces from seasonal wrapping paper. Small printed motifs can become cute accents for holiday cards.
This is a nice addition to mixed-media projects because the clean edge stands out against paint, textured paper, and handwritten notes.
The tool makes one simple shape, but I can change the style completely by choosing different paper. That's what keeps it useful in my craft box.